
Introduction to Arduino Mega
In situations when your project demands complex Arduino loaded with functionalities, Arduino Mega is the best choice to go with. While many of the other popular Arduino boards are used for fundamental projects and applications, Arduino Mega offers the advantage in terms of large memory space.
Arduino Mega is a microcontroller that depends on ATmega2560. It’s twice as long as the Arduino Uno and has more functionalities than many other Arduino boards. You can plugin and use the Arduino and code it with Arduino IDE. You don’t need any other external components or devices to use this board. This is best for Arduino Mega if you need a large memory or a high number of input-output pins.
Specifications
Operating voltage: 5 V
Input voltage: 7-12 V
Input voltage: 6-20 V
DC current per input/output pin: 20mA
DC current for 3.3 V pin: 50mA
Flash Memory: 256 KB (8 KB of flash memory is used with the help of bootloader)
Clock Speed: 16 MHz
Pin Configuration
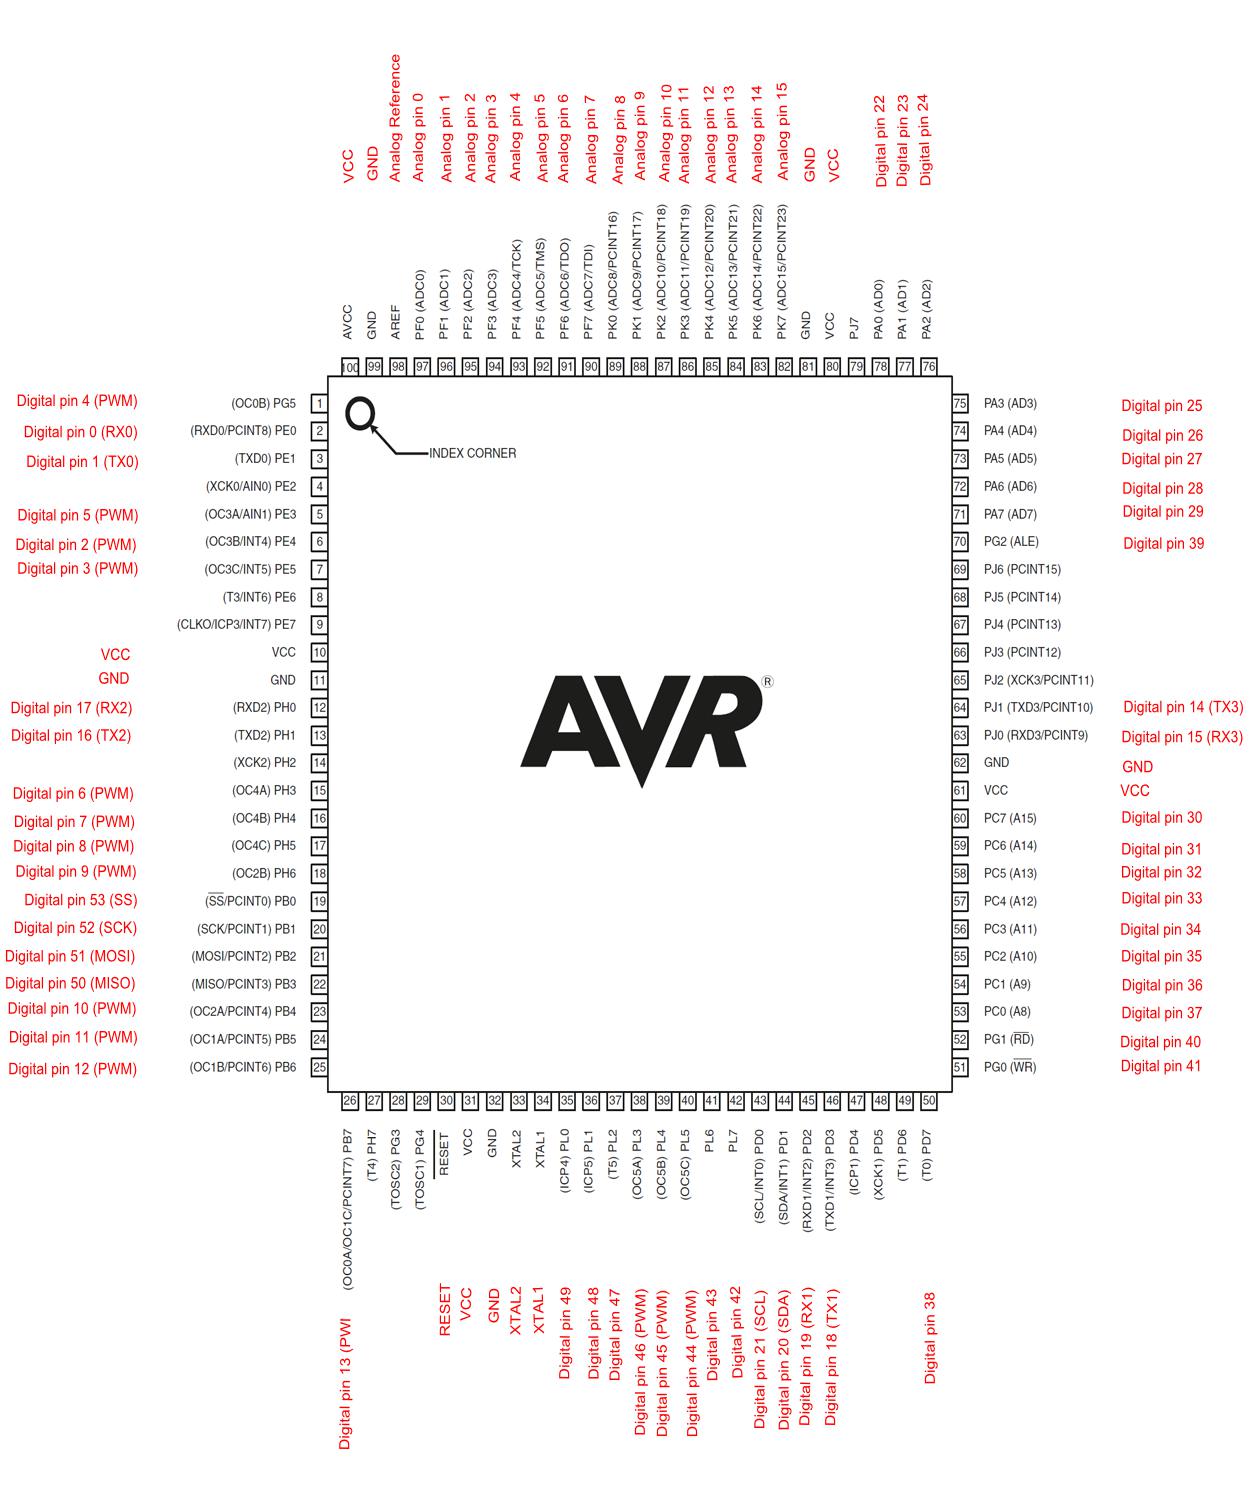
Serial communication ports: 4 (8 pins)
Digital input/ output pins: 54 (15 pins for Pulse Width Modulation)
Analog input/output pins: 16
Ground pins: 5
ISP programming pins: 6
USART pins: 4
Voltage 3.3 V: 1
Powering the Board
You can power the board in three different ways.
1. Use a USB cable to transfer the code from the system to the board.
2. Use a power jack to provide DC voltage.
3. Use the Vin pin of the board within the regulated voltage limit.
One additional feature of Arduino Mega is its ability to protect the computer in times of overheating. Though most computers come with overheat protection, this fuse will provide an additional safety layer from any high current surges.
Software Programming
You can program Arduino Mega with IDE and code it with C programming. After completing and debugging the code, you can connect the Arduino board with your system and burn the code directly. The communication between the board and the computer takes place using the STK500 protocol.
You don’t need to connect the external power supply to the Arduino board when you connect it with the USB cable. If you want to reset the board and load new code, then you can simply press the reset button.
Since Arduino Mega comes in with a built-in boot loader, you don’t need any external burner system to load the code to the board. You can use the multitasking ability of Arduino Mega with additional operating systems like RTX & FreeRTOS. You can build your custom program with this and save time on working with the Arduino board.
Shield Compatibility
When you are choosing a shield for Arduino Mega, you have to make sure that it doesn’t exceed the operating voltage of 3.3 V or 5 V. Else, it can damage the board. Also, you have to make sure that the distribution of the shield should be compatible with the board. Once you choose the right shield, you can easily attach it to the board and use it directly.
Different Applications of Arduino Mega
There are several projects you can build with Arduino Mega like:
1. Bioprinter
2. Security control device with the simulator
3. 8-bit computer
4. Temperature detector with an accurate sensory program
5. Industrial distance sensor
6. Robotic projects like line tracer, obstacle avoidance bot, bluetooth control bot, automated irrigation system, etc.
7. 3D printer
8. WiFi-enabled devices
9. Motion sensing alarm with IR sensors
10. Telescope control
11. PID control system
Finding it exciting to try out so many projects with Arduino Mega? Get a high-quality Arduino Mega board now to start building your innovative projects.